
Setting Up an Email Server for the Direct Email Spooling Attack (How-to Guide)
This how-to guide aims to demonstrate how easy it is to circumvent expensive email security solutions with simple open-source tools. Email administrators can also follow this guide to build their email delivery service for email direct spool attack security assessments.


In this article, we are publishing the configuration settings of the Postfix email server we used to assess which top-tier and mid-tier Australian law firms are vulnerable to the direct email spool attack. This how-to guide demonstrates how easy it is to circumvent expensive email security solutions with simple open-source tools. Email administrators can also follow this guide for their security assessments.
This is a multi-part article. In Part 1., we revealed how big law firms in Australia are susceptible to direct email spool attacks and what the implications were. In a nutshell, we found that the email security solution at one-third of the law firms assessed can be circumvented with a simple trick. Part 2. reveals how we used a handful of open-source intelligence (OSINT) data sources to identify misconfigured email servers.
Prerequisites of the Proof of Concept Server
Although it was easy to set up a basic email server, it was crucial to configure everything correctly to ensure maximum deliverability of the outgoing emails.
Our email delivery infrastructure was:
- A virtual server running Postfix mail server on Ubuntu 18.04 LTS;
- A domain name; and
- An email client.
Virtual Server
We picked one of the popular low-end VPS providers to host our email server. We preferred to run our Postfix email server on Ubuntu 18.04 LTS, but other operating systems and mail transport agents may also work fine.
We found that the virtual server provider (VPS) was blocking the outgoing TCP port 25 to prevent any email abuse. To solve this, we had to raise a ticket for asking the technical support to leave the network port unblocked.
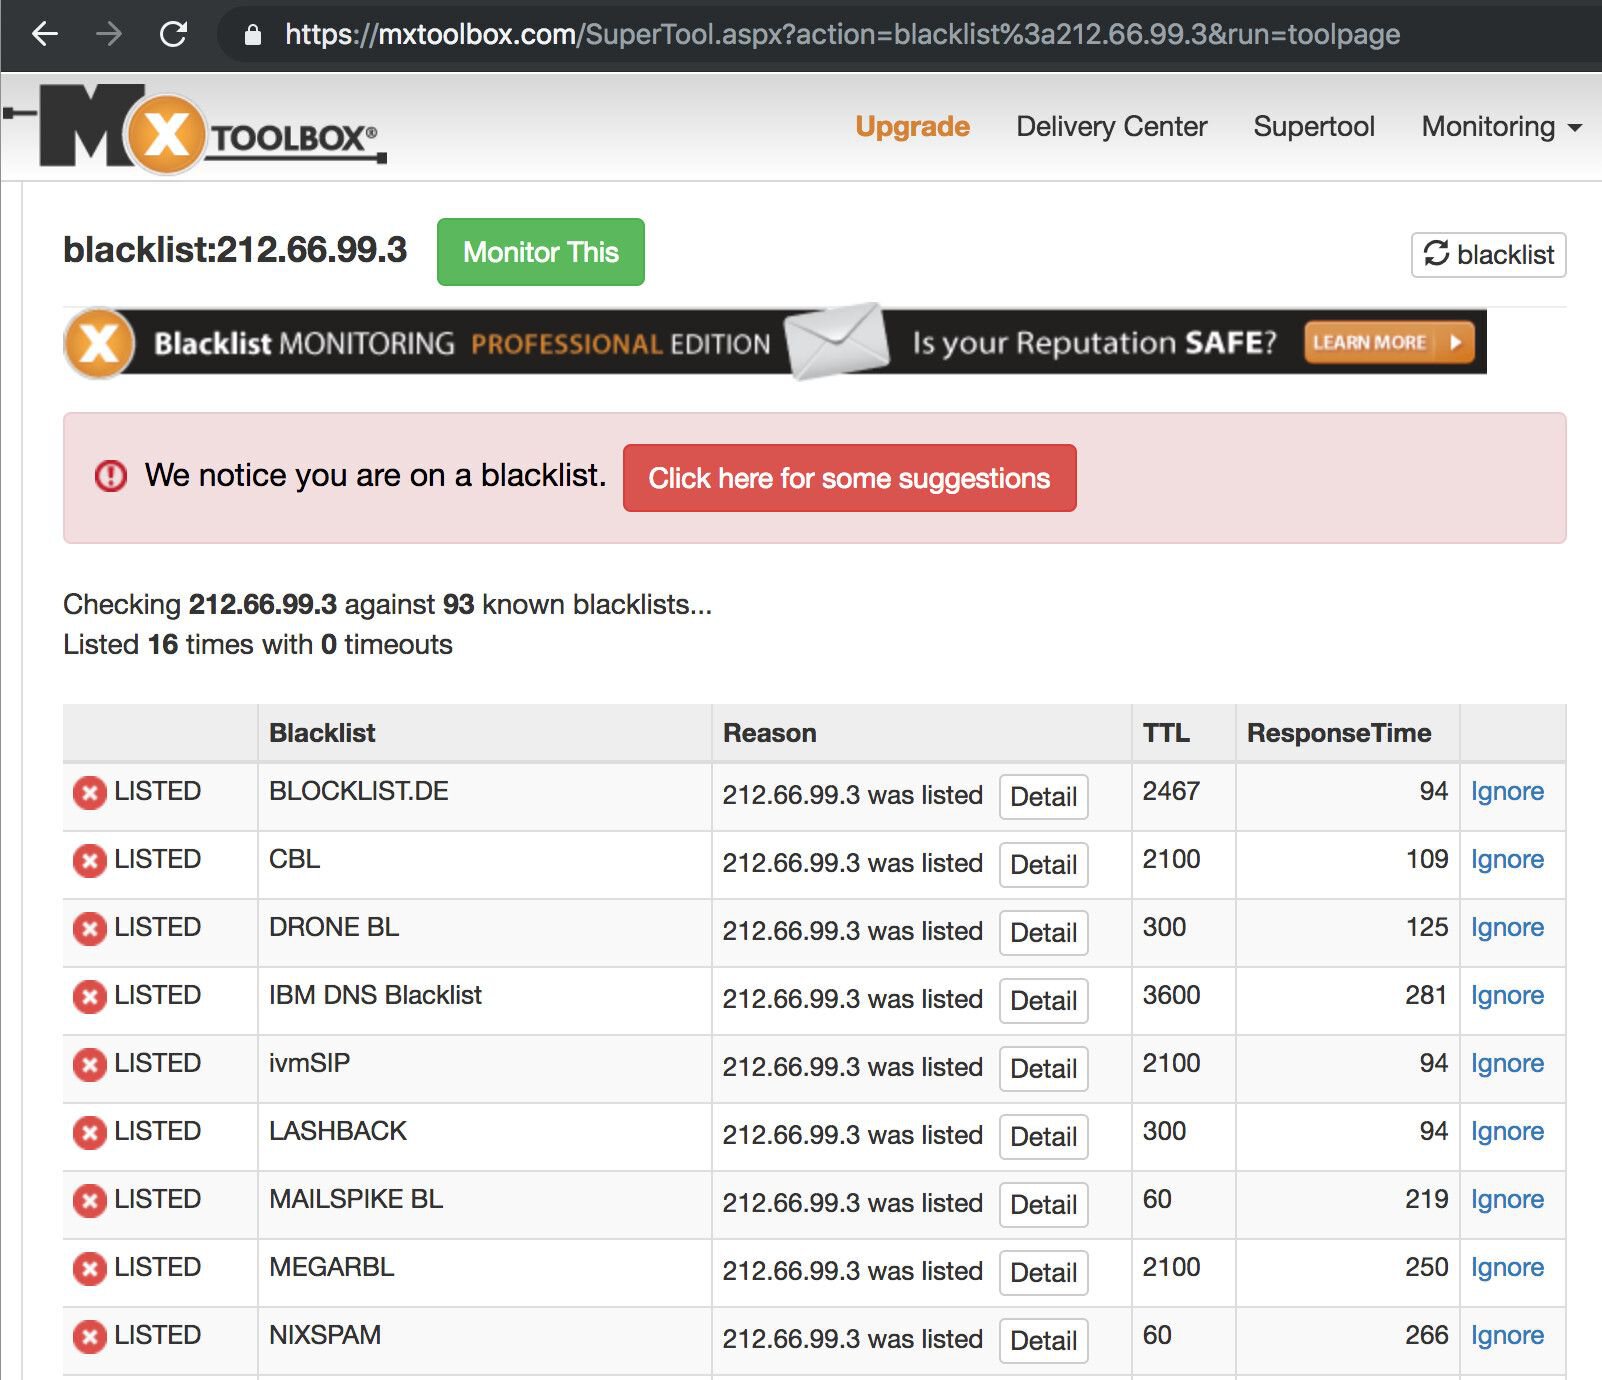
The second most important thing was the pristine reputation of the IP address. As our preferred VPS provider assigns the IP address automatically to the new virtual server, we had to manually check if the IP address is on a blacklist anywhere. We used the IP reputation lookup tool at MXToolbox to query the IP address against the most popular DNSBL block list. Luckily, the IP address was ‘clean’.
Adding the DNS Records
Once we purchased a domain name and our virtual server was running, we had to create the necessary forward and reverse DNS records, otherwise, spam filters would have flagged our emails as suspicious and moved them to the junk email folder.
Note: We will use example.com.au as the domain name throughout this configuration guide. Replace this with your own domain name as applicable.
First of all, we had to create an A record for our brand-new mail server used for the assessment.
mail.example.com.au. A <ip address>
Then we created an MX record to start accepting mail on our domain:
example.com.au. MX 10 mail.example.com.au
The PTR record was also essential as spam filters may reject emails coming from SMTP servers with a missing reverse record.
We also added the following TXT record for creating our SPF record:
example.com.au. TXT "v=spf1 a mx ~all"
As for the DKIM record, we created it later on as part of the Postfix configuration process.
Finally, we created a DMARC record to tie the SPF and future DKIM records together. We added the following DMARC policy:
_dmarc.example.com.au. TXT v=DMARC1; p=none;
Configuring the Postfix SMTP Service
Once the IP address, domain name, DNS records and the VM were all sorted, we logged into the server via SSH.
To install and configure Postfix email server, we had to make sure the operating system was up to date:
# apt update && apt upgrade
Then we installed the Postfix and OpenDKIM packages:
# apt install postfix mailutils opendkim opendkim-tools
Once the installation was complete, we opened /etc/postfix/main.cf file in our favourite text editor and added (or changed) the following parameters as the following:
myhostname = mail.example.com.au   # This is the same host name as the A record we created earlier
mydomain = example.com.au  # This is the domain name we purchased
myorigin = $mydomain
mydestination = $myhostname, $mydomain, localhost.$mydomain, localhost
home_mailbox = Maildir/
smtpd_sasl_type = dovecot
smtpd_sasl_path = private/auth
smtpd_sasl_auth_enable = yes
smtpd_sasl_security_options = noanonymous
broken_sasl_auth_clients = yes
smtpd_sasl_local_domain = $mydomain
smtpd_recipient_restrictions =
	permit_mynetworks
	permit_sasl_authenticated
	permit_auth_destination
	reject
smtp_header_checks = regexp:/etc/postfix/smtp_header_checks
# We will specify here where we want to feed our emails
transport_maps = hash:/etc/postfix/transport
# OpenDKIM settings for DKIM-signing our outgoing emails
milter_default_action = accept
milter_protocol = 2
smtpd_milters = local:opendkim/opendkim.sock
non_smtpd_milters = local:opendkim/opendkim.sock
We added the following entries to /etc/postfix/smtp_header_checks to protect our privacy. This setting removes various email headers from the outgoing emails.
/^Received: .*/		IGNORE
/^User-Agent: .*/	IGNORE
/^X-Originating-IP:/    IGNORE
/^X-Mailer:/            IGNORE
/^Mime-Version:/        IGNORE
/^User-Agent:/          IGNORE
/^Subject:/		WARN
We ran the following command to verify that the Postfix configuration files were free from any errors:
# postfix check
Then we added our first email user. The ‘myuser’ in this example was the username part before the ‘@’ symbol in our email address.
# adduser myuser
The command was asking us to enter a password for the new user. We had to save the password for later as this password was the SMTP and IMAP login credentials as well.
Configuring the DKIM Signing
To configure OpenDKIM for digitally signing every outgoing email, we had to add the opendkim user to the postfix group first:
# gpasswd -a postfix opendkim
Then we opened the /etc/opendkim.conf file and altered the following lines like the following:
Canonicalization        relaxed/simple
Mode                    sv
SubDomains              no
We also added the following lines to the configuration file:
AutoRestart             yes
AutoRestartRate         10/1M
Background              yes
DNSTimeout              5
SignatureAlgorithm      rsa-sha256
We changed the Socket parameter to the following:
Socket local:/var/spool/postfix/opendkim/opendkim.sock
Finally, we added the following lines to the end of the configuration file:
KeyTable           /etc/opendkim/key.table
SigningTable       refile:/etc/opendkim/signing.table
ExternalIgnoreList  /etc/opendkim/trusted.hosts
InternalHosts       /etc/opendkim/trusted.hosts
We saved opendkim.conf and created a directory structure for OpenDKIM then:
# mkdir -p /etc/opendkim/keys
# chown -R opendkim:opendkim /etc/opendkim
# chmod go-rw /etc/opendkim/keys
# mkdir /var/spool/postfix/opendkim
# chown opendkim:postfix /var/spool/postfix/opendkim
We opened /etc/opendkim/signing.table file and added the following line:
*@example.com.au p1._domainkey.example.com.au
We saved the file and opened /etc/opendkim/key.table for adding the following:
p1._domainkey.example.com.au example.com.au:p1:/etc/opendkim/keys/example.com.au/p1.private
Finally, we updated /etc/opendkim/trusted.hosts with the following lines:
127.0.0.1 localhost *.example.com.au
It was time to generate your DKIM keys. We created the following directory:
# mkdir -p /etc/opendkim/keys/example.com.au
Then we created the signing keys:
# opendkim-genkey -b 2048 -d example.com.au -D /etc/opendkim/keys/example.com.au -s p1 -v
We set the permissions:
# chown opendkim:opendkim /etc/opendkim/keys/example.com.au/p1.private
Creating the DKIM Record
Then we took the contents of the /etc/opendkim/keys/example.com.au/p1.txt file and created the DNS record holding our DKIM public key.
For example, our file featured the following entry:
p1._domainkey	IN	TXT	( "v=DKIM1; h=sha256; k=rsa; "
	  "p=MIIBIjANBgkqhkiG9w0BAQEFAAOCAQ8AMIIBCgKCAQEA2ds4zLgOQammxc6NUOOuGtMZBbpefjkjFmui+EmBR5zybOqZfSxjfVY59AsO0sqYsr6QhOChr8co230wBwjcDOGhCHxX3ifxks0l6XkdRtwBHP2Cr8wWAAzRMek/tIvchWWy6NEzGTpR1cQvwWpHPsR2iP+DQlqqOAQ6FUY/bVqAEU4JdKGXv2kZU4lSMvGj7IC0L7VVvOw9Ds"
	  "DJPklskxg+qinrPh58EZBGKOzzJ+6sJlUUHacr3oaMhnaxiQzKLwySjsEIlyuJwu/CgUMlF1smTCq4djpuv5OwgUOHpGcuqoftJAzsdPtIOxGrE1tFOOHar9NI+L8tUdFy2eW9ewIDAQAB" )  ; ----- DKIM key p1 for example.com.au
After removing the newlines and whitespaces, we added the following to our DNS record:
p1._domainkey.example.com.au TXT v=DKIM1; h=sha256; k=rsa; p=MIIBIjANBgkqhkiG9w0BAQEFAAOCAQ8AMIIBCgKCAQEA2ds4zLgOQammxc6NUOOuGtMZBbpefjkjFmui+EmBR5zybOqZfSxjfVY59AsO0sqYsr6QhOChr8co230wBwjcDOGhCHxX3ifxks0l6XkdRtwBHP2Cr8wWAAzRMek/tIvchWWy6NEzGTpR1cQvwWpHPsR2iP+DQlqqOAQ6FUY/bVqAEU4JdKGXv2kZU4lSMvGj7IC0L7VVvOw9DsDJPklskxg+qinrPh58EZBGKOzzJ+6sJlUUHacr3oaMhnaxiQzKLwySjsEIlyuJwu/CgUMlF1smTCq4djpuv5OwgUOHpGcuqoftJAzsdPtIOxGrE1tFOOHar9NI+L8tUdFy2eW9ewIDAQABOnce the DNS record was created, we could test it by running the following command:
# opendkim-testkey -d example.com.au -s p1 -vvv
The following response told us that the key was added correctly:
opendkim-testkey: key OK
We ran a final test of the configuration files, then restarted the OpenDKIM and Postfix services to apply the new changes:
# postfix check
# systemctl restart opendkim
# systemctl restart postfix
Installing Dovecot IMAP Service
The following step was installing and configuring the IMAP service running on Dovecot. We had to install certbot first for obtaining a valid SSL certificate for the SMTP and IMAP services.
# apt install certbot dovecot-imapd
We requested a new certificate for Dovecot and Postfix with the following command:
# letsencrypt certonly --standalone -d mail.example.com.au
We added the following lines to /etc/postfix/main.cf for enabling SSL/TLS on Postfix:
smtpd_tls_cert_file=/etc/letsencrypt/live/mail.example.com.au/fullchain.pem
smtpd_tls_key_file=/etc/letsencrypt/live/mail.example.com.au/privkey.pem
smtpd_use_tls=yes
smtp_tls_security_level = may
smtp_tls_loglevel = 1
smtpd_tls_loglevel = 1
smtpd_tls_session_cache_database = btree:${data_directory}/smtpd_scache
smtp_tls_session_cache_database = btree:${data_directory}/smtp_scache
smtpd_tls_security_level=may
smtpd_tls_protocols = !SSLv2, !SSLv3
We verified the configuration file again and reloaded Postfix to apply the changes:
# postfix check
# systemctl reload postfix
Now we moved on to the configuration of Dovecot. We opened /etc/dovecot/conf.d/10-ssl.conf for replacing the self-signed certificate with the one we got from Let’s Encrypt:
ssl_cert = </etc/letsencrypt/live/mail.example.com.au/cert.pem
ssl_key = </etc/letsencrypt/live/mail.example.com.au/privkey.pem
We opened /etc/dovecot/conf.d/10-master.conf and appended the following under the # Postfix smtp-auth line:
  unix_listener /var/spool/postfix/private/auth {
    mode = 0660
    user = postfix
    group = postfix
  }
We opened /etc/dovecot/conf.d/10-mail.conf to replace the `mail_location` stanza as the following:
mail_location = maildir:~/Maildir
We edited /etc/dovecot/conf.d/10-auth.conf then and commented out the following:
disable_plaintext_auth = yes
We added `login` to the `auth_mechanisms` option:
auth_mechanisms = plain login
We located the auth_username_format option and changed the setting as the following:
auth_username_format = %n
We finished the configuration by reloading Dovecot:
# systemctl reload dovecot
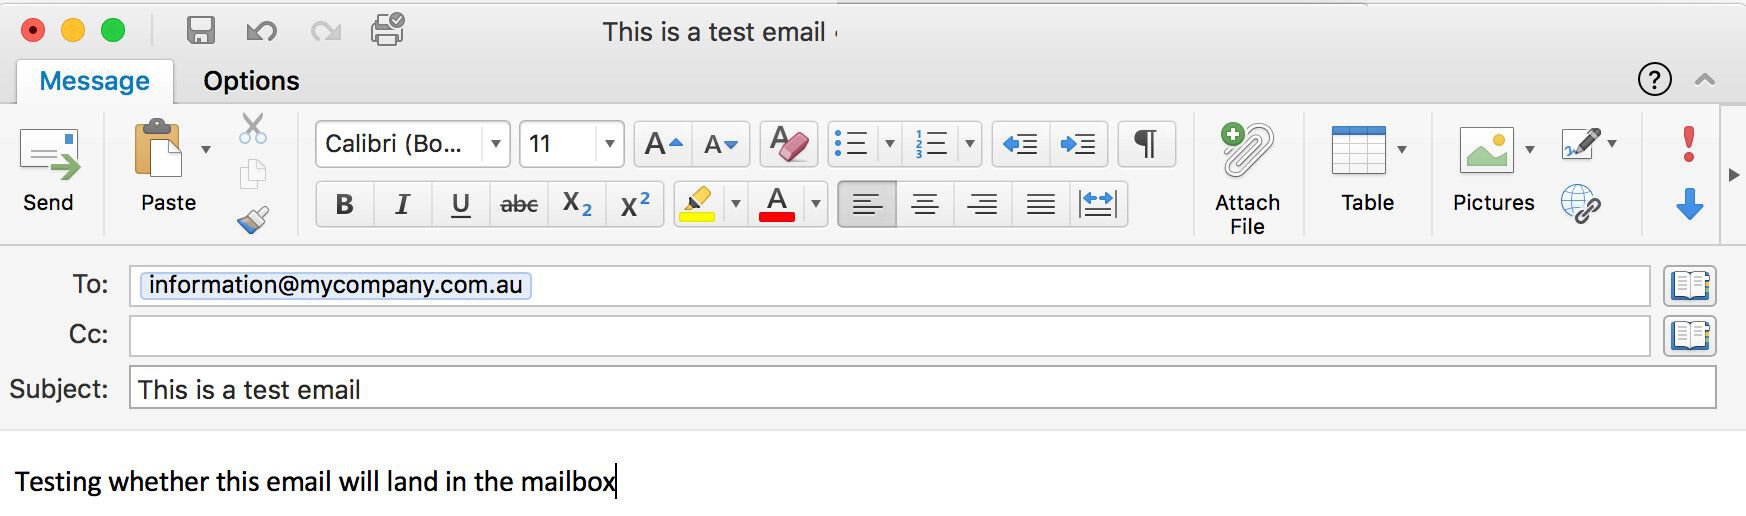
Configuring Your Email Client
We fired up our favourite email client for adding our new email account. The configuration details were the following:
SMTP server: mail.example.com.au:25
IMAP server: mail.example.com.au:993
Enable encryption: yes
Username: [email protected]
Password: *******
The username and password are the details we entered when running adduser earlier.
Once your email server was up and running, we made sure to send a few test emails at https://www.mail-tester.com for verifying that everything is running correctly.

Deploying the First Email Transport Rule
Once the email server was running, it was time to test out with a real email. Let us assume we are assessing whether mycompany.com.au is susceptible to direct email spooling attack. MyCompany subscribed to a popular email security solution a year ago and runs its own Microsoft Exchange email server to manage the organisation’s emails.
To enforce our email server using a specific email server to deliver emails, we need to deploy a transport rule first. In this example, we used one of the OSINT methods to reveal that MyCompany is exposing its Microsoft Exchange server on smtp01.mycompany.com.au to the internet.
In this case, we have to open /etc/postfix/transport and add the following line:
mycompany.com.au :[smtp01.mycompany.com.au]
Then we have to run the following command to apply the changes:
# postmap /etc/postfix/transport
The transport file specifies that every email sent to the mycompany.com.au domain has to be delivered through smtp01.mycompany.com.au instead of the email security solution specified by the MX records of mycompany.com.au. Now, all we need to is firing up the email client and sending a test email to [email protected].
If the remote server accepts the email, we should see a similar line in /var/log/mail.log:
Sep 1 03:00:10 mail postfix/smtp[15079]: 13EA3814F1: to=<[email protected]>, relay=smtp01.mycompany.com.au[203.0.113.21]:25, delay=514, delays=507/0.02/2.2/5.2, dsn=2.0.0, status=sent (250 2.0.0 Ok: queued as 7A823C44B17 UID 5b9a75b434fb78cf)
If the remote server does not accept emails from us (i.e. not vulnerable to direct email spool attack), the delivery should generate an error like this:
Sep 1 05:39:54 mail postfix/smtp[15817]: AF2577F231: to=<[email protected]>, relay=smtp01.mycompany.com.au[203.0.113.21]:25, delay=3.1, delays=0.05/0/2.8/0.22, dsn=5.0.0, status=bounced (host smtp01.mycompany.com.au[203.0.113.21]:25 said: 550 Invalid recipient <[email protected]> (#5.1.1) (in reply to RCPT TO command))
Any undelivered messages in the delivery queue can be listed with the following command:
# postqueue -p
Summary
Email security is a complicated matter, and as a result, organisations frequently leave their local email servers wide-open for cybercriminals. This oversight leaves organisations susceptible to phishing attacks as our latest report on direct email spool attacks demonstrates.
This simple how-to guide demonstrates how easy it is to set up an email server for circumventing expensive email security solutions protecting large organisations. All we needed is a virtual server, a domain name, approximately $20 and some free time to build our infrastructure capable of carrying out direct email spool attacks.
Considering the rising number of Business Email Compromise (BEC) fraud, we urge you to assess the security of your email gateways to prevent abuse.
This article was co-written by Gabor Szathmari and Nicholas Kavadias.